MacTexan Wallpaper o' th' Week

Sedona Starry Night


Help us, WE'RE BROKE:
Search MacTexan
MacTexan on Twitter

Thursday
Oct012015

How to Verify/Repair Disk Permissions in El Capitan

The new GUI for the long-time Mac staple Disk Utility in El Capitan no longer includes buttons for Verify or Repair disk permissions. Apple obviously believes that since El Capitan includes the new System Integrity Protection that prevents changes to critical system files that giving users the capability to check and/or fix disk permissions is no longer necessary. Well, that may be true for the vast majority of Mac users, but you and I don’t quite fall into that category, do we? People like us who install OS X on non-Apple hardware or add non-Apple cards and drives to our machines often need to turn off SIP to do the low-level monkeying we are apt to do. Never fear. It seems all Apple has done is removed the buttons from Disk Utility’s GUI. The functionality remains albeit via the command line only. These two commands get the job done just fine:

diskutil verifyvolume [your drive designation]

diskutil repairvolume [your drive designation] 

For [your drive designation] use the OS X mount point ( ie. /Volumes/Macintosh HD ) or device designator ( ie. /dev/disk0s1 ). This information is available via the Disk Utility app. Simply open Disk Utility and click on the volume/partition you want to work on.


That’s all there is to it. Verify and repair disks ‘til your heart’s content!

Saturday
Sep122015

Disable El Capitan’s System Integrity Protection

After running Apple’s latest version of OS X (10.11, El Capitan) on a couple of my Macs for about two months I’ve become completely enamored with it. Now that the “Gold Master” seed is out for developers I updated all my Macs including my main production machine.* Even though El Capitan contains a few new features, it is (by Apple’s own admission) a “stability release”. By every measure, OS X 10.11 is rock-solid stable…
…and fast!
To further this notion of stability, Apple has introduced a new feature called System Integrity Protection that prevents changes to key OS components and critical applications like Mail and Safari even if you’re logged in with administrator credentials. This expands on the “gatekeeper” philosophy introduced in Mountain Lion that prevented installation of non-App Store applications by default. The idea behind System Integrity Protection (SIP) is to insure OS X’s stable operation by preventing modification of key system components and apps; be it accidently, inadvertently or maliciously. This is a great idea for 99% of users, but you and I fall into that last 1%, don’t we? My first encounter with SIP happened when I tried to change the icon for the Apple Mail app. Why would I want to do that you ask? Maybe I’m allergic to postage stamps. What does it matter? It’s just an icon, but Mail is one of the apps System Integrity Protection locks down. Virtually everything installed with the OS X installer and everything in the Applications folder is the same way. If you want to change anything protected by SIP you have to take very deliberate steps to disable it first. Here’s how:
  • Reboot your Mac in recovery mode by pressing and holding command + R until the Apple logo is displayed.
  • Once running in Recovery Mode, open Terminal from the Utilities menu and execute the command: csrutil disable
  • Reboot your Mac normally
After you’ve done whatever it was you needed SIP disabled for, you have a decision to make. Should you re-enable this feature Apple thinks will save us from unwanted system tampering or leave it disabled? After all, you’ve lived without System Integrity Protection until now, right? Well, it’s up to you, but if you do want to turn it back on you simply reboot into recovery mode again and execute csrutil enable. Bingo. Your Mac is back in Cupertino’s loving, protective arms!
* I’m always anxious to try out the latest betas and I keep an older (2009) MacBook Pro available as a test machine for just that purpose. In fact, it’s the only way I recommend anyone try early betas. I’ve had to resort to “nuke & pave” on more than one occasion when an early OS X beta bites the dust, leaving my poor 17” MBP hopelessly rebooting to the dreaded or booting successfully just to kernel panic a couple of minutes later.


Tuesday
Jul212015

Is Your Dock Out of Control? No Problem.

After a while even the most disciplined Mac user (like myself...ahem) can wind up with way too much stuff in their dock. Some software installs aliases in there by default. You may add things thinking (at the time) that it would be a good idea to have a launcher handy or you may delete items thinking you won't need them only to find out later you really miss them. Well, here's a one-line terminal command to perform a reset on your dock to turn back the clock to when you first got your Mac or first installed OS X:

defaults delete com.apple.dock; killall Dock

This command deletes your dock configuration and reverts to OS X's default. Voila! Your dock is like new again.


Wednesday
Dec102014

Netgear Nighthawk AC1900 & DD-WRT: A Winning Combo

Works great. Looks UGLY!Last week I did something very uncharacteristic for a self-professed, died-in-the-wool, drank the KoolAid, Apple fanboy. I replaced my four year old Airport Extreme (Wireless-N) router with a new Netgear AC1900. Why would I commit such a traitorous act? Well, I guess my gearhead left brain overpowered my Apple-nirvana right brain. Also, I’ve been wanting to upgrade to wireless-AC since I bought my new MacBook Pro a few months back and I learned that Apple stopped supporting SNMP on their newest wireless-AC capable AirPort Extreme. In my world of limited bandwidth, SNMP is a feature I don’t want to live without. Additionally, I’ve been dying to install and run DD-WRT, the open-source router firmware that gives sub-$200 routers the power of Cisco devices costing ten times more. DD-WRT firmware is a lean Linux kernel that supports all typical router functions plus has features for VPN (Virtual Private Networking), QoS (Quality of Service like bandwidth shaping and prioritization), NAS (Network Attached Storage) and a host of features for network traffic monitoring, graphing and logging. In practical terms, it gives me the ability to keep my daughter’s Hulu habit from hogging all our Internet bandwidth, lets me log into my home network from anywhere and the router also serves as a handy, “always on” secure file server that our Macs, iOS devices and (cough) Windows machines can all access. 

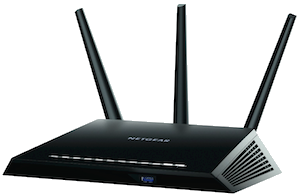
I did my homework before purchasing the AC1900. I read enough router reviews and comparison pieces to suit me for two lifetimes. I wanted a wireless AC device with top-notch hardware specs of course, but equally important: I wanted a router proven to easily convert to and work well with the latest version of DD-WRT firmware.  Now, I’m not here to write a “router rundown”. Believe me, there’s more than enough of those floating around on the net. One site I found particularly useful is flashrouters.com. It flushes out several routers spanning a wide economic spectrum pointing out the features of each in a clear, concise manner. Every router specified on the site is proven 100% compatible with DD-WRT and they rated the Netgear Nighthawk the best for 2014. I chose the AC1900 because I wanted a popular router from a name brand company with lots of horsepower, high-end hardware features and support for the latest wireless standards. 

So…Netgear? Check.

Dual-core 1 GHz. processor, 256 MB RAM, USB 3 and 5 port gigabit switch? Check.

Dual band Wireless-AC up to 1900 Mb/sec. with three antennas? Check and Check!.

Add to this list the fact that the AC1900 works so well with the DD-WRT firmware, Netgear advertises that piece of information on their web site. When I bought the router in August it was by far the best hardware available for DD-WRT. I think it has since been supplanted, but the AC1900 has been around just long enough for there to be a substantial knowledge base around using it with DD-WRT. Let’s face it, replacing a router’s operating system via the “nuke & pave” method isn’t something one does on a lark. I’m the kind of person who likes to know several others have done this successfully, lest I brick a brand new $200 router. Call me timid.

Well, it turns out I made a good choice. The router works great and the installation of DD-WRT could not have been easier. I simply replaced my AirPort Extreme with the Netgear box, downloaded what I determined to be a very stable and functional DD-WRT build for the AC1900 from myopenrouter.com and used the built-in update function of the router to flash the new operating system. I’m not going to go into the details here (one of the Web sites linked to in this article provide all the step-by-step instructions you need), but the entire process was so simple the whole effort took less than 30 minutes. After that, it was simply a matter of setting the admin password and setting up the ports I needed to forward. DD-WRT’s web interface is so simple and clean I managed to do everything I needed in just a few minutes without searching the web for help.

Now I have a router that’s much more capable than an AirPort Extreme and the wireless-AC is every bit as fast with a little better range. The hardest thing for me is not seeing the sleek, white antenna-less box with the Apple logo on top. Now my router looks like some futuristic battle tank from a cheap FPS! Oh well. Can’t have everything, I guess.

Thursday
Apr172014

Connect to Network Shares Automatically at Startup

I've spent the vast majority of my professional life as an IT person. Whether as a help desk person, app developer, sysadmin or manager, I was submersed in the Microsoft world for a lotta years. Add a MCSE (Microsoft Certified Systems Engineer) certification to all that tenure and I think I qualify as an expert of that realm. After buying my first Mac in 2006, I quickly realized how I'd cheated myself out of years of computing pleasure by not entering the Apple world sooner. I've grown to love OS X for its stability, ease-of-use and UNIX underpinnings. As owner of an IT service business, I still have to deal with Windows almost daily, but now its something I endure out of necessity. Enjoyment is derived from my Macs.

As a well-versed Windows user, one thing that's always bugged me about OS X is it's lack of a few intuitive network functions I’d come to take for granted in Windows. The one that I had to find a fix for very early on was the absence of a "Reconnect at logon" checkbox when you connect to a shared network folder using the Finder's "Connect to server.." option from its "Go" menu (or CMD + K). I keep all my 300+ movies on a Seagate 4TB NAS (Network Attached Storage) to avoid soaking up over half my iMac's 1TB hard drive. This folder is shared across all my iTunes libraries. iTunes has no problem with this unless I forget to CMD + K before trying to watch one of these movies. OS X does allow me to connect to the "Movies" folder on my NAS when I login by dragging the mounted folder into the "Login Items" list in the System Preferences "Users" pane. When you do it this way, however, every time you log in, a Finder window showing the network share pops up for each share you connect to. It's not the end of the world, but it is annoying, especially if you connect to a few of these. As I added more shares, I wound up with a desktop full of Finder windows every time I logged in.

I eliminated this annoyance by using Automator to create an app to mount network folders, then adding that app to my login items instead of the individual attached folders. Guess what? Now when I log in, my shares are mounted and no Finder windows pop up. Here's the Automator build…


Here’s the steps to build it: 

  1. Open Automator (/Applications/Automator) and create a new application.
  2. From the “Files & Folders” section add the action “Get Specified Servers”
  3. Within the Get Specified Servers action click “Add…” and add the path to the network share. (Hint: If you’re unsure of what this is, right-click the connected folder in finder and select “Get Info”  In the Info dialog the path will be displayed in General:, Server:)
  4. Repeat for each share you’d like to connect to.
  5. From the “Files & Folders” section add the action “Connect to Servers”
  6. Save the application. (In this example I named the app “Vaults”)
  7. That’s it. (You’ll notice in the example that I added a couple of extra steps to add a verbal message. That is completely optional and unnecessary. I just like to have a alert telling me that everything is done.)

After this I simply dragged my new “Vaults” app into my list of login items. Now, every time I login, my two NAS shares are automatically connected and I don’t have those pesky Finder windows to close. Simple.