MacTexan Wallpaper o' th' Week

Sedona Starry Night


Help us, WE'RE BROKE:
Search MacTexan
MacTexan on Twitter

Monday
Sep242012

iperf3: A Simple and Fast Tool For Network Troubleshooting

Have you ever had the need to test a network connection's speed? Sure, the "Network Preferences" app says you're connected at 100 Mb, but can you really transfer files between two computers at that speed? Maybe you wonder why a wireless connection seems slower in one room versus another. There are a couple of ways to check things like copying a large file from one machine to another and see how long it takes. Or you could buy an expensive network sniffer that 1) collects and displays way more information than you need or want and 2) can take hours to learn how to use. If you have a couple of Macs and you're not afraid of Terminal, the free utility iperf3 only takes a minute to set up the first time and will test your network throughput in five seconds. If you don't have two Macs or otherwise need a Windows version, you can download one here. Here's how to use iperf3:

  • First download iperf3 here. (It's free, but you need to "pay" with a tweet.)
  • Second, extract iperf3.zip and copy the iperf3 app to /bin on both Macs.
  • On the machine you use as a server, open terminal and type iperf3 -s
  • On the client machine open Terminal and type iperf3 -c

The server Terminal screen should look something like this:

The client's should look something like this:

These screenshots were captured from an iperf test with my 27" iMac acting as the server and my 17" MacBook Pro as the client. Both machines were connected to my network via the Gb Ethernet port. In this case I was happy transferring 936 Mbits per second since the theoretical maximum is 1000.  

The iperf3 application doesn't use any file transfer or other system-dependent protocols that might throw variability into the test. The server simply spews as much traffic as it possibly can to any iperf3 client that requests it. It is a pure test of any network connection, wired or wireless. I've found it particularly useful for checking wireless throughput in various areas of my house or a client's office. There is so much black magic involved with wireless networking that the Mac's system utilities can't always give you a clear picture of what's happening. You may have experienced times when everything looked good (signal strength, connection speed, etc.) but files transferred slowly or with errors. If iperf3 says you're transferring close to the maximum for your connection, you can pretty much rule out your network as the problem.

I've been using iperf for years because it is tiny (<80KB), simple to use and FREE. It is one tool that goes with me everywhere.

Friday
Aug242012

Swap the Hard Drive in a 2009 27" iMac with a SSD

Crucial M4 512 GB SSD ($399 at Amazon)As I've said many times before, I love my 27" iMac (11, 1). I bought it as soon as it was available in late 2009. I ordered it from Apple with the fastest Core i7 available (2.8 Ghz), 2 gigs of RAM and the standard 1TB hard drive. I simultaneously ordered a 16 GB memory kit from OWC and it was waiting when my new iMac arrived. I upgraded the RAM before I turned on the machine for the first time. Note: Never buy RAM upgrades from Apple unless you're buying a machine (MacBook Air or Retina MacBook Pro) with non user-replaceable memory. OWC is a terrific resource for RAM chips at half the cost Apple charges and swapping memory is a pretty simple thing. (For now, that is. I think the days of DIY Mac memory upgrades may be numbered.)

With its beautiful 27" display and i7 horsepower, this iMac quickly became my favorite computer of all time. The only complaint I've ever had was about the hard disk. It came from Apple with the standard 1 TB, 7200 RPM Seagate Barracuda. It is a fine hard disk and it has never given me any problems, but it is what it is, a hard disk. Before I continue, I need to give you a little background concerning my other Mac, a 2009 17" MacBook Pro. It's a 3.06 Ghz Core 2 Duo with 8 gigs of RAM. By all rights it shouldn't hold a candle to my iMac, but even though it has half the RAM and half the processor cores, it often felt quicker than the big boy. The reason: it has a 256 gig SSD. With less CPU, less RAM and less GPU than my iMac, my MBP booted much faster and apps launched faster still. I had to remedy this.

I've been window shopping for the last couple of years for an SSD to put into my iMac, but prices were just too steep. I wanted at least 500 GB of storage before going to all the trouble of ditching my original 1TB Barracuda. Two years ago, SSDs of that size were over $700. Too much. I could have gone with a $425 256 GB drive, but just didn't want to give up 3/4 TB of storage. Thanks to price erosion in the SSD market, the 500+ GB drives just tipped below the $400 mark. Time to strike.

I bought a Crucial M4 512 gig SSD and a Thermaltake 3.5 - 2.5" adaptor from Amazon for $428 a couple of days ago and began studying how to disassemble my precious 27" machine and replace the boot disk. As always, I found all the information I needed at iFixIt.com. Note: If you ever need to fix or upgrade a Mac, check with iFixIt.com. They have an extensive array of on-line Mac repair and upgrade procedures complete with high-res photos, videos and instructions even a novice can understand and follow. 

One thing I learned was that Apple uses the temperature sensor built into the factory hard disk to control the hard drive cooling fan. There is a separate cable to this sensor that plugs into the logic board. Unless you buy a replacement drive from Apple, disks don't come equipped with this sensor. Leaving this cable unplugged will cause the hard drive fan to run at max and sound like a vacuum cleaner. After bouncing around a few forums and help documents, I learned of three solutions to this problem. One is to buy an external sensor made for the optical drive and tape it to the side of the new disk as a replacement for the on-board sensor. The second is to create a jumper and short the pins on the sensor cable to fake-out the machine into thinking the drive was cool. The third was to install the $29 HDDFanControl app that tells your Mac to use the drive's S.M.A.R.T. sensor instead of the on-board one. I chose option three.

Apple's oddball temperature sensor.

This morning, with parts and tools in-hand, I shut down and unplugged my iMac, placed it on my bed and followed iFixIt's instructions. Forty minutes later, the machine was back on my desk, plugged in and ready to go.

What happened when I pushed the power button put a huge smile on my face that is reappearing now as I write about it. The familiar Apple startup chime sounded, then a couple of seconds later the Apple logo appeared. I looked for the progress "spinner" for a second, but then the desktop appeared instead! In another three or four seconds the machine was completely booted. I couldn't believe it, so I restarted. This time I used the stopwatch on my iPhone to see just how quick it was. 31 SECONDS from startup chime to fully running. Also, launching most apps happens so quickly their icon doesn't bounce in the dock! This iMac runs better now than when it was new. The HDDFanControl app works as advertized, keeping the drive temperature between 105º - 125º by controling the fan speed properly. My only regret was not doing this sooner.  Anybody need a 1TB iMac disk?

Tuesday
Aug212012

Why Won't My Mac Go To Sleep?

For some reason I've always had trouble getting my 27" iMac to sleep when it was supposed to. I spent a lot of time searching forums and trying a dozen or so different things offered up by users and Apple alike. A few times I found something that seemed to work, only to find my Mac awake again in the middle of the night. It turns out there are literally hundreds of things capable of rendering your Mac a total insomniac. Everything from Bluetooth connections to wonky external hard drives can be the culprit. The process of elimination can take forever. How do you shorten the list without trying everything one at a time? Well, thanks to a post at Macworld, I learned once again that the command line would come to my rescue. This simple command:
pmset -g assertions
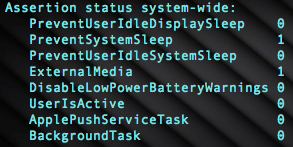
will result in a list of processes "asserting" themselves on OS X. Something like this...
 

...showing the number of processes doing things to your system. The two concerning system sleep prevention are PreventSystemSleep and PreventUserIdleSystemSleep. If either of these have a process count greater than zero then you need to look further. The command results go on to list (in order) specific processes assocoated with non-zero values in the above list...

As you can see, the AppleFileServer process was the culprit in my case. Obviously, some other machine on my network was connected to a share on my iMac, preventing it from snoozing. If your case is not so obvious, you can lookup the pid in Activity Monitor (in this example, pid 666) to see if you can gleen more information. Activity Monitor lets you sort active processes by pid, making things easy to find and even easier to quit. 
Sunday
Aug192012

Find Out Who's Connected to Your iTunes Library

Have you ever tried to quit iTunes and gotten the warning message: "others are connected to your iTunes library...", going on to say that quitting will disconnect whoever it is using your media? If you're like me and have a house full of Apple gear using HomeSharing, you never know which AppleTV is streaming a movie or who's iPhone is jamming to one of your playlists.  Common courtesy dictates at least checking what's going on. There are a couple of ways to do this. One is screaming at the top of your lungs, "WHO'S STREAMING FROM MY IMAC??!!!"  The other is much more civil and certainly less invasive to your neighbors...

...from the Terminal prompt, type: 
lsof |grep iTunes |grep TCP
...and your results should look something like this:
iTunes    8258  joe   23u    IPv4 0xd862114a55e74e55       0t0      TCP *:daap (LISTEN)
iTunes    8258  joe   24u    IPv6 0xd862114a3499b6e5       0t0      TCP *:daap (LISTEN)
iTunes    8258  joe   49u    IPv4 0xd862114a4fa01cc5       0t0      TCP 192.168.1.114:daap->192.168.1.107:62788 (ESTABLISHED)
Now, you will need to know your user's IP address, but that shouldn't be a problem for anyone reading the "GEARHEAD" page of MacTexan!


Tuesday
Mar132012

Run the New iPhoto on Original iPad

Apple has a way of kicking owners of dated hardware to the curb when it comes to new software. I own an iPhone 4S and really enjoy the new iPhoto app Apple released last week. It really pissed me off to learn it wouldn't install on my original iPad (at least not the conventional way). If you own an original iPad (iPad 1?), there is a way to get iPhoto installed without jailbreaking your device. First, you need to spend 5 bucks and buy iPhoto from the App Store. Second, you need to download and install Apple's iPhone Configuration Utility 3.5. It's free and you can download it here. Next, with your iPad connected to your Mac via USB, run the utility. Your iPad should show up under "Devices" in the sidebar. Select your iPad then click the "Applications" tab. You'll see a list of all the apps installed on your iPad. Click the "Add" icon in the upper-left corner of the toolbar and browse to ~/Music/iTunes/iTunes Music/Mobile Applications and select "iPhoto 1.0.ipa". iPhoto will then show up in the applications list with an "Install" button on the right. Just click the install button and wait for about 30 seconds while iPhoto installs. When finished, the "Install" button will change to read "Uninstall".

That's it. iPhoto runs fine on the original iPad. It looks like Apple just wants to keep us buying new hardware and withholds apps to give us the proper motivation.

Note: This may not be a good solution if you sync your iPad regularly. iTunes will force iPhoto's removal before it will allow your device to sync. I only sync my iPad every couple of weeks or so. When I do, I simply start the utility after I finish and click the "Install" button again.